Ticket Types
A ticket type is one line a buyer can put in a basket: a name, a price, a capacity and a window during which it can be bought. Everything your event sells through Sway is defined on this screen, and nothing sells until at least one ticket type exists here.
Open the ticketing screen
- Open Manage, then click your event.
- Click Tickets in the left sidebar.
The heading reads Ticket Management, with Add and manage ticket types for your event. underneath, and two buttons on the right: Add Ticket and Export CSV.
The screen only works on an event that sells through Sway. On any other event it shows a single line, Sway Tickets is not enabled for this event. Enable it in Settings., and nothing else. Turn the switch on in Event settings first.
A working payout account comes first
Ticket types are the shopfront. The payout account is the till, and it lives on the promoter page, not on the event and not on this screen. You can build a perfect price list without one, publish it, and watch every buyer fail at the payment step.
Two banners at the top of this screen tell you when that is the case:
- No Stripe account is linked to a promoter on this event. Ticket sales will fail until configured. with a Configure in Payouts link.
- The linked Stripe account is not yet fully activated (charges disabled). Ticket sales are blocked. The promoter must complete their identity verification on their Stripe dashboard. with a View Payouts settings → link.
Create a ticket type
- Click Add Ticket at the top right. The Add Ticket Type dialog opens.
- Fill in Ticket name. It is required and it is what buyers see.
- Add a Description if useful. It is marked (optional) and capped at 240 characters, with a counter under the box.
- Set Price (€). A comma or a full stop both work as the decimal separator, and the value is rounded to two decimals when you leave the field. Zero is accepted and makes the type a free registration. Under the field, a line shows what the buyer will pay, for example The buyer pays €25.02, including €1.02 service fee. See Service Fee.
- Leave Currency alone. It is fixed to EUR and the control is disabled.
- Set Max qty / order, or leave it empty for Unlimited.
- Set Total capacity, or leave it empty for Unlimited.
- Set Tickets per purchase (Multi-tickets) 🎫. The hint says it plainly: 1 = standard ticket.
- Choose Status, Active or Inactive.
- Choose Visibility, Public or Hidden/Private.
- Set Sale start and Sale end if the type should not be on sale for the whole life of the event. Both are marked (optional).
- Click Add ticket. A Ticket type added. confirmation appears and the row joins the table.
An event holds at most 20 ticket types. The section heading above the table counts them for you, and once you reach the ceiling Add Ticket greys out and hovering it reads Limit of 20 ticket types reached. Duplicating a type counts against the same 20.
Hidden types never appear on the public page. The hint under the field says they unlock only via an access code or presale link, and saving one opens a distribution dialog straight away so you can mint that link. The row then carries a Hidden/Private pill, and Distribute is added to its row menu.
If you arrived here from the guided setup, the dialog is already open: creating a first ticket type is the last step of the ticketing journey described in The guided setup.
Capacity is counted in purchases, stock is shown in tickets
This is the single most misread thing on the screen, and it is only a problem on types that sell more than one ticket at a time.
You type capacity in purchases. Total capacity is the number of times this type can be bought, not the number of people it lets in. Max qty / order is in the same unit: it caps how many of this type one basket can hold.
The table shows tickets. The Stock column, and the Remaining card above it, multiply what is left by Tickets per purchase, because the useful number is how many people can still get through the door.
| You enter | Tickets per purchase | The Stock column reads |
|---|---|---|
| 100 | 1 | 100 / 100 |
| 50 | 2 | 100 / 100 |
| 30 | 4 | 120 / 120 |
Hover the first number for the breakdown, which names each figure as it goes: 80 available · 4 pending · 16 sold / 100 capacity. A type with no capacity set shows ∞ instead, and the Remaining card shows ∞ when nothing is capped, or a number followed by + ∞ when some types are capped and others are not.
A small bar under the figure tracks the same ratio. It is green while stock is comfortable, amber once five or fewer purchases remain, and red at zero.
Change the capacity of a type that is already selling
- Open the row's three-dots menu and click Manage capacity.
- Type the new figure in New capacity.
- Click Save.
Capacity moves by difference, never by reset. Raising a type from 100 to 120 adds 20 to what is left; it does not hand you 120 fresh places on top of what you already sold. The hint in the dialog states the rule: Total capacity. Tickets sold and pending checkouts are tracked separately — changing this adjusts the remaining count by the same amount. The Total capacity field in the edit dialog behaves identically.
Sell several tickets in one purchase
Tickets per purchase turns one line into a bundle: a pair, a table of six, a weekend pass for four. One purchase, one price, several separate tickets with their own QR codes.
- The row shows (×N) after the name, and the price you set is the price of the whole bundle.
- Sold counts individual tickets issued, not purchases, so a bundle of two bought ten times reads 20.
- The revenue under it is per purchase, since the bundle was sold once.
- The buyer's service fee is charged once per purchase, on the bundle price: a pair at €40 carries one €1.50 fee, not two.
Sold is read from the tickets themselves, not recalculated from the multiplier, so it stays correct on types you sold before changing the number. The pending figure is the one that suffers from such a change: it is derived arithmetic rather than a stored count, and it stops being reliable after you edit the multiplier on a type that already has sales.
Set a sale window
Sale start and Sale end are both optional. Left empty, the type is on sale for as long as the event is. The hint under Sale end notes that it Defaults to event end date.
Under each field sits the clock it speaks in, as a short zone name such as CEST, followed by a reminder of the event's own start and end times.
Both are the event's timezone, the one set in Settings → Dates, not your computer's. So the reminder can be copied into the field as it stands, and an event abroad needs no conversion in your head: type the local hour the doors open there. Someone in another country editing the same event sees the same figures and means the same instant.
How the status badge is decided
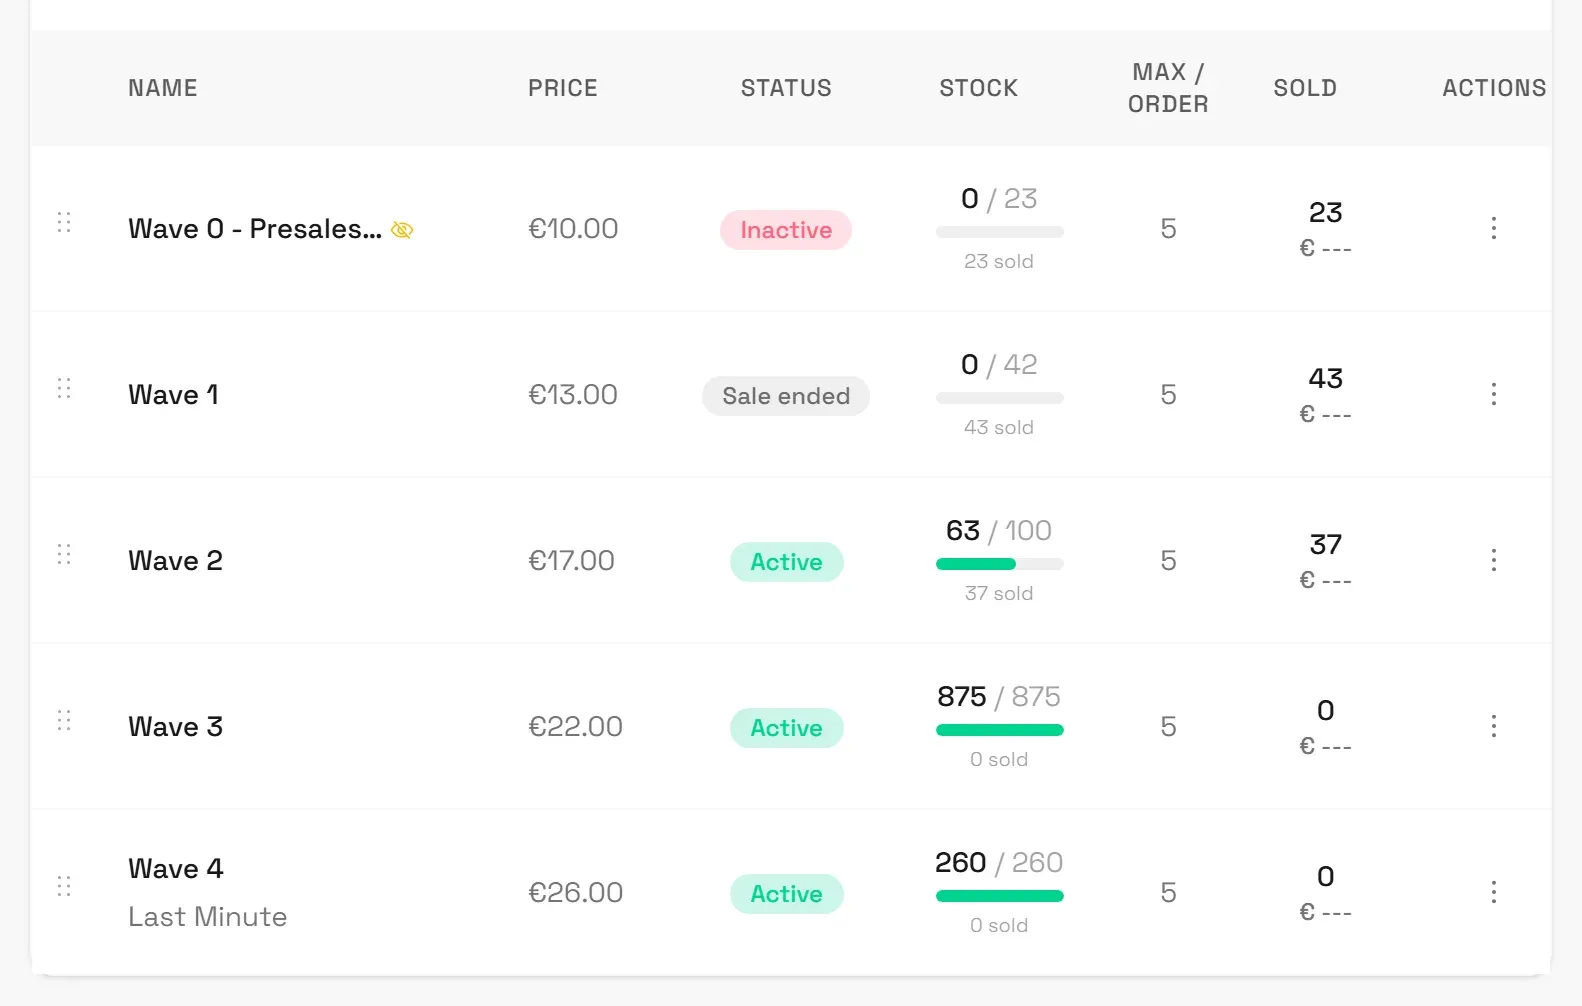
Each row carries exactly one badge. The first condition that matches wins, and the dates are only consulted once the type is switched on:
- Inactive if Status is Inactive, whatever the dates say.
- Sale ended if the sale end time has passed.
- Not on sale yet if the sale start time has not been reached.
- Active otherwise.
So a type with a perfectly valid window still reads Inactive while the switch is off. Flip it from the row menu with Activate, or the other way with Deactivate.
The badge re-checks itself about once a minute while you stay on the page, so a window opening or closing flips it without a reload.
Door validity window
Valid at the door from and Valid at the door until are a second window, separate from the sale window above: they set when the scanner accepts this ticket type, not when you can buy it. Both are optional and both are marked (optional).
The hint under the fields says it plainly: The scanner refuses this ticket outside these hours, for example a late-entry ticket from 04:00. For a night that goes past midnight, pick the next day's date. Empty: valid all event long.
The classic use is a cheaper "late entry" ticket. Rave Rebels sells one that only lets people in from 04:00, priced under the ticket that works all night: set Valid at the door from to 04:00 the next calendar day and leave Valid at the door until empty.
Outside the window the scanner refuses the ticket with Not valid yet or No longer valid, and staff can still let the person in with Let in anyway. See Scanners for the full list of door refusals and how overrides are recorded.
Buyers see the window next to the ticket type, on the ticket shop and on their own ticket, as Entry from {time}. A ticket type restricted to a zone (configured on Scanners) shows Access: {zone} the same way.
The amber pending figure
A buyer who reaches the payment step is holding their tickets. Those tickets leave Stock at that moment, before any money has moved, so two people cannot buy the last place at once.
They show up as an amber dot and a number under the stock cell, and as the pending figure in the stock tooltip. Hovering the dot reads Checkouts in progress that haven't paid yet. They are gone from what is available and they are not in Sold, because nothing has been paid.
- The buyer pays. The hold becomes a sale and moves into Sold.
- The buyer walks away. The hold is released and the places return on their own, normally within about fifteen minutes and at the latest within thirty.
The figure is a subtraction, not a count of checkouts
Nothing on this screen counts live checkouts. The amber number is worked out as capacity, minus what is left, minus the tickets issued by paid orders. Every place that has left stock without becoming a paid sale therefore lands in it, whatever took it, and only a genuine checkout hold comes back on its own.
Guestlist comps land in it and stay there. The guestlist issues against any ticket type of the event, not only its own free pool, and a comp on a capped type consumes a place exactly like a sale. Comps are deliberately kept out of Sold, since they are giveaways rather than revenue, so the place they took has nowhere else to show: it reads as pending, and it still reads as pending on the night. Ten comps on a capped type mean a permanent amber 10. Revoke on Guestlist is the one thing that clears it, because revoking is what puts the place back.
So an amber figure that refuses to move is comps, not hesitant buyers. Read it as two things stacked: whatever disappears within the half hour was checkouts, whatever survives is comped places that are genuinely gone. The tooltip describes only the first, and nothing on this screen names the second.
A sold-out type with pending stock may or may not be sold out. If Stock reads 0 with an amber count beside it, wait half an hour and look again before touching the capacity. Raise it by what the comps took and you oversell the room by exactly the number of guests you invited yourself.
Work through the table
Columns are Name, Price, Status, Stock, Max / Order, Sold and Actions. Max / Order is hidden on narrow screens.
Name, Price, Stock and Sold sort on click, and clicking the same header cycles through ascending, descending, and back to your saved order.
The order you save is the order buyers see. Drag the handle at the left of a row to rearrange the list. Dragging is only available when the table is in its saved order with nothing searched or filtered; otherwise the handle is greyed and reads Reset filters and sort to reorder. A successful move confirms with Ticket order updated.
Advanced filters narrows the table by Status, by Stock with the options All, Unlimited, Low stock (≤10) and Out of stock, and by a range of sales. Reset clears the lot. Note that the stock filters count purchases, the unit you typed, not the ticket figure shown in the column.
Export CSV downloads the table as a file. Two things to expect: the column headings inside it are in French whatever language your admin is in, and its stock column carries the raw remaining purchase count rather than the ticket figure on screen.
Edit, duplicate and delete
The three-dots menu on each row holds Deactivate or Activate, Manage capacity, Edit, Duplicate, Delete, and Distribute on hidden types.
Edit reopens every field of the creation form as Edit Ticket Type, and Save applies it. Editing a price does not touch tickets already sold.
Duplicate copies a type, which is the quickest way to build an early-bird ladder from one carefully written description.
Delete is refused on a type that has orders behind it, but not where you would expect. The interface holds a greyed Delete entry with the explanation Cannot delete a ticket type that has been sold. Deactivate it instead., and that state never triggers: the check behind it compares the wrong kind of value, so Delete stays enabled and clickable on every type, sold or not. Only a missing ticketing permission greys it, along with the rest of the menu.
What happens instead:
- Delete opens the Delete Ticket Type dialog, which asks Are you sure you want to delete the ticket "…"? This action cannot be undone.
- Confirming runs a check for existing orders. That check only sees orders placed by your own account, so it catches a test purchase you made yourself and answers Cannot delete: orders exist for this ticket., closing the dialog.
- On tickets bought by anybody else, and on types used for guestlist comps, that check comes back empty and the deletion is attempted for real. The database refuses it, and the toast carries the untranslated database error naming a constraint on the order lines rather than a sentence written for you. The dialog stays open behind it.
Nothing is deleted in any of those cases, which is the outcome you want: a type people hold tickets for is never destroyed under them. What is missing is the early, readable warning. Treat a refusal at that step, whatever its wording, as "this type has orders behind it", and reach for Deactivate, which stops sales while leaving buyers, orders and scans intact.
Where the rest of ticketing lives
| To do this | Go to |
|---|---|
| Turn Sway Tickets on or off | Settings → Main, see Event settings |
| Choose which promoter is paid | Settings → Payouts |
| Connect the Stripe account itself | The promoter page, see Connect payouts |
| Read sales, stock and check-ins at a glance | Event dashboard |
| See how the buyer's service fee is worked out | Service Fee |
| Let someone else manage tickets | Permissions, see Manage permissions |
Managing ticket types needs the ticketing permission on the event. Without it every control on this screen is still visible and still readable, but disabled, and Add Ticket carries the tooltip You don't have permission to add a ticket.
Selling Tickets
How ticket selling fits together in the Sway web app: what must exist before the first sale, the order to set it up in, and the six screens involved — four sidebar rows and two tabs.
Coupons
Create and manage discount codes on a Sway-ticketed event in the Sway web app: discount types, expiry dates and usage limits.